State Management Chart
Now a days state management is becoming a required part of web applications.
As we know web apps are getting richer and more complex, maintaining the state of data is becoming more difficult. Here, state management comes into the picture which helps us to maintain the app state(data) with less complexity which makes your app more robust and easy to maintain.
Mainly the Flux or Redux concept are used to maintain the state of data in a web application. There are so many libraries available for different front-end frameworks to implement Flux or Redux pattern in your app.
Here, Iwould like to share knowledge about the Data observable service which is an in-built feature of Angular and can be used for state management in Angular app.
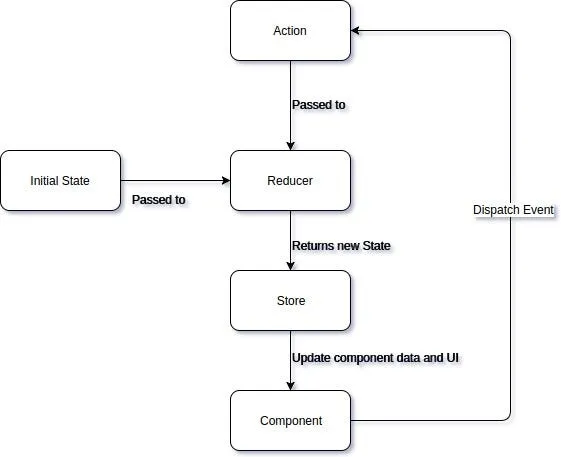
In state management we have mainly three entity which helps us to implement the Flux / Redux pattern.
- Store: which holds app state(data)
- Reducers : which takes action and state as input and return the new state.
- Actions: They are the events dispatched by component to change the state.
Let’s get started how we can use Data observable service for state management.
Creating the store
1. We will create store name it movie.store.ts. It will contains the state value of your app.
1import { ADD_MOVIE } from './movie.actions';
2import { Http, Headers, Response } from '@angular/http';
3import { Injectable } from '@angular/core';
4import { Observable } from 'rxjs/Observable';
5import { Subject } from 'rxjs/Subject';
6import { BehaviorSubject } from 'rxjs/BehaviorSubject';
7
8@Injectable()
9export class MovieStore {
10
11  public movieStore$: BehaviorSubject<any>;
12
13  public movieStates = [{
14    name: 'Movie 1',
15    url: 'http://google.com'
16  }];
17
18
19  constructor() {
20    this.movieStore$ = new BehaviorSubject(this.movieStates);
21  }
22
23}
Creating the reducer
2. Now we will create reducer which takes action from the component and returns the new state.
1import { Injectable } from '@angular/core';
2import { ADD_MOVIE } from './movie.actions';
3import { MovieStore } from './movie.store';
4@Injectable()
5export class MovieReducers {
6
7  constructor(private _movieStore: MovieStore) {
8
9  }
10
11  movieReducer(action: any) {
12
13    switch (action.type) {
14      case ADD_MOVIE:
15        const newState = [...this._movieStore.movieStates, action.payload];
16        this._movieStore.movieStore$.next(newState);
17      // default:
18      // return this._movieStore.movieStates;
19    }
20  }
21}
Creating the actions
3. We will now list down all the actions which are going to be dispatched by components.
1export const ADD_MOVIE = '[MOVIE] Add';
2export const REMOVE_MOVIE = '[MOVIE] Remove';
Creating the components
4. Now we will create different components which dispatched the action according to the user action.
1import { ADD_MOVIE } from './../movie.actions';
2import { MovieReducers } from './../movie.reducer';
3import { MovieStore } from './../movie.store';
4import { Component, OnInit, ViewChild, ElementRef } from '@angular/core';
5
6@Component({
7  selector: 'app-create-movie',
8  templateUrl: './create-movie.component.html',
9  styleUrls: ['./create-movie.component.css']
10})
11export class CreateMovieComponent implements OnInit {
12
13  @ViewChild('movieName') movieName: ElementRef;
14  @ViewChild('movieUrl') movieUrl: ElementRef;
15
16  constructor(private _movieStore: MovieStore, private _movieReducers: MovieReducers) { }
17
18  ngOnInit() {
19  }
20
21  addMovie(): void {
22    this._movieReducers.movieReducer({
23      type: ADD_MOVIE, payload: {
24        name: this.movieName.nativeElement.value,
25        url: this.movieUrl.nativeElement.value,
26      }
27    });
28    this.movieName.nativeElement.value = '';
29    this.movieUrl.nativeElement.value = ''
30    console.log(this.movieName.nativeElement.value);
31
32  }
33
34}1import { MovieStore } from './../movie.store';
2import { Component, OnInit } from '@angular/core';
3
4@Component({
5 selector: 'app-read-movie',
6 templateUrl: './read-movie.component.html',
7 styleUrls: ['./read-movie.component.css']
8})
9export class ReadMovieComponent implements OnInit {
10 public movieList: any;
11 constructor(private _movieStore: MovieStore) { }
12
13 ngOnInit() {
14 this._movieStore.movieStore$.subscribe((data) => {
15 this.movieList = data;
16 console.log(this.movieList);
17
18 }, (error) => { });
19
20
21 }
22
23}So, this is how we can implement state management in the app using angular inbuilt features.
In this blog, we have seen how to use Data observable service for state management in Angular applications. We have learned how to create a store, a reducer, and actions, and how to use them in different components. Data observable service is a simple and powerful way to manage the app state using Angular’s inbuilt features and RxJS observables. It also avoids the need for external libraries or dependencies.
If you liked reading this blog, then also check out my other blogs:
- How to set up continuous integration for Angular with Angular CLI, Jenkins, and PhantomJS
- How to create a configurable datetimepicker directive in Angular v.2 and v.4
If you are looking for Angular development services, you can contact us. We have years of expertise in Angular development and can help you build high-performance, scalable, and user-friendly web applications that drive success.


Authors