

Continuous Integration and Continuous Deployment (CI/CD) can dramatically improve the way you build, test, and ship your Flutter iOS apps. Instead of manually archiving builds, uploading to TestFlight, or emailing testers every time you make a change, you can automate the entire process. This not only saves time—it reduces human error and keeps your release process consistent.
In this guide, we'll walk through how to set up a robust CI/CD pipeline using Fastlane and GitHub Actions. By the end, you'll be able to automatically distribute development builds to Firebase App Distribution and push production builds straight to TestFlight with just a git push.
What you'll need
Before we dive into the setup, make sure you have the following ready:
- A Flutter project with iOS support
If you've already run flutter create and selected iOS as a platform, you're good to go. - A macOS machine with Xcode installed
Since Flutter relies on Xcode for building iOS apps, you'll need a Mac with Xcode set up. Make sure you’ve opened Xcode at least once to accept the license agreement and installed the command line tools. - A GitHub repository
Your Flutter project should be version-controlled and pushed to GitHub. This will allow GitHub Actions to detect changes and trigger your workflows. - An Apple Developer Account
You'll need an active Apple Developer account (paid, not free) to generate signing certificates and deploy builds to TestFlight. - A Firebase Project
Set up a Firebase project so you can distribute builds to testers via Firebase App Distribution. This is useful for internal QA, external beta testers, or early feedback before submitting to the App Store.
Step 1: Install Ruby on Mac
Flutter iOS development requires Ruby, and although it comes preinstalled with Xcode, the version is often outdated. Let's install the latest stable version:
brew install ruby
echo 'export PATH="/usr/local/opt/ruby/bin:$PATH"' >> ~/.zshrc
After installation, restart your terminal or run source ~/.zshrc to apply the changes.
Step 2: Install fastlane for Flutter CI/CD iOS
Fastlane is a tool that automates building and releasing iOS and Android apps. Install it using Homebrew:
brew install fastlaneStep 3: Initialize Fastlane in your project
Navigate to your project's iOS directory and initialize Fastlane:
cd ios
fastlane init
During initialization:
- Select "Automate beta distribution to TestFlight."
- Log in with your Apple ID
- Follow the prompts to set up your app on App Store Connect
After completion, you should see a new fastlane folder Gemfile in your iOS directory, and your app should be registered on App Store Connect.
Step 4: Configure your Fastfile
Replace the default Fastfile content with the code below. This setup supports multiple environments (development and production):
1default_platform(:ios)
2platform :ios do
3  desc "Push a new iOS development build"
4  lane :development do |options|
5    # Setup the keychain and match to work with CI
6    setup_ci()
7
8    # Increase build timeout to reduce failures on CI
9    ENV["FASTLANE_XCODEBUILD_SETTINGS_TIMEOUT"] = "120"
10    ENV["FASTLANE_XCODEBUILD_SETTINGS_RETRIES"] = "6"
11
12    # Get required certificates and profiles
13    match(app_identifier: "<<identifier for development flavor>>", type: "adhoc")
14
15    # Handle input parameters
16    version = options[:version] || "1.0.0"
17    build_number = options[:build_number] || 1
18    release_notes = options[:release_notes] || "Lots of amazing new features to test out!"
19    groups = options[:groups] || "<<Default tester group name>>"
20    testers = options[:testers] || ""
21
22    # Update version and build number
23    increment_version_number(version_number: version)
24    increment_build_number(build_number: build_number)
25
26    # Build iOS app
27    build_app(
28      workspace: "Runner.xcworkspace",
29      scheme: "development",
30      export_method: "ad-hoc",
31    )
32
33    # Upload to Firebase Distribution
34    firebase_app_distribution(
35      app: "<<APP ID from Firebase app>>",
36      service_credentials_file: "fastlane/service-account.json",
37      testers: testers,
38      groups: groups,
39      release_notes: release_notes,
40    )
41  end
42
43  desc "Push a new iOS production build"
44  lane :production do |options|
45    # Setup the keychain and match to work with CI
46    setup_ci()
47
48    # Handle input parameters
49    release_notes = options[:release_notes] || "Lots of amazing new features to test out!"
50    groups = options[:groups]
51
52    # Increase build timeout to reduce failures on CI
53    ENV["FASTLANE_XCODEBUILD_SETTINGS_TIMEOUT"] = "120"
54    ENV["FASTLANE_XCODEBUILD_SETTINGS_RETRIES"] = "6"
55
56    # Get required certificates and profiles
57    match(app_identifier: "<<identifier>>", type: "appstore")
58
59    # Auto-increment build number based on TestFlight
60    updated_version_number = bump_build_number()
61    increment_build_number(build_number: updated_version_number)
62
63    # Build iOS app
64    build_app(
65      workspace: "Runner.xcworkspace",
66      scheme: "production",
67      export_method: "app-store",
68    )
69
70    # Upload to TestFlight
71    pilot(
72      api_key_path: "fastlane/store.json",
73      skip_waiting_for_build_processing: true,
74      changelog: release_notes,
75      groups: groups,
76    )
77  end
78
79  # Helper function to get the next build number
80  def bump_build_number()
81    latest_build_number = latest_testflight_build_number(initial_build_number: 0)
82    return (latest_build_number + 1)
83  end
84end
Replace the placeholders (<<identifier>> , <<Default tester group name>> and <<APP ID from Firebase app>>.) with your actual app information.
Step 5: Configure match for certificate management
Match is a Fastlane tool that helps manage iOS certificates and provisioning profiles.
fastlane match initCreate a private Git repository to store your certificates and profiles securely. Once created, set up your certificates:
For TestFlight production release:
fastlane run match type:"appstore" app_identifier:"<<identifier>>"For Firebase Distribution (development):
fastlane run match type:"adhoc" app_identifier:"<<identifier for development flavor>>"Note: You'll be prompted to create a password to encrypt the certificates. Remember this password, as you'll need it for your GitHub Actions secrets.
Step 6: Configure Firebase app distribution for Flutter CI/CD
Add the Firebase App Distribution plugin to Fastlane:
fastlane add_plugin firebase_app_distributionNext:
- Create and configure a Firebase project for your iOS app
- Generate a service account file
- Save the service account JSON file to /ios/fastlane/service-account.json
Step 7: Create API key for TestFlight uploads
Create a file called store.json in the ios/fastlane folder with the following structure:
1{
2    "key_id": "<<KEY ID>>",
3    "issuer_id": "<<ISSUER ID>>",
4    "key": "-----BEGIN PRIVATE KEY-----\n<<REPLACE WITH YOUR KEY>>\n-----END PRIVATE KEY-----"
5}
To get the required information:
- Go to App Store Connect → Integrations → App Store Connect API
- Navigate to "Keys" and generate a new API key
- Download the API key (.p8 file)
- Replace the placeholders in the JSON file with your actual key information
Step 8: Set up tester groups
- Add testers to Firebase App Distribution and create groups for your development builds
- Add testers to App Store Connect and create groups for your TestFlight builds
Step 9: Project configuration checks
Ensure your Xcode project is properly configured:
- Disable "Automatically manage signing" in your Xcode project settings:
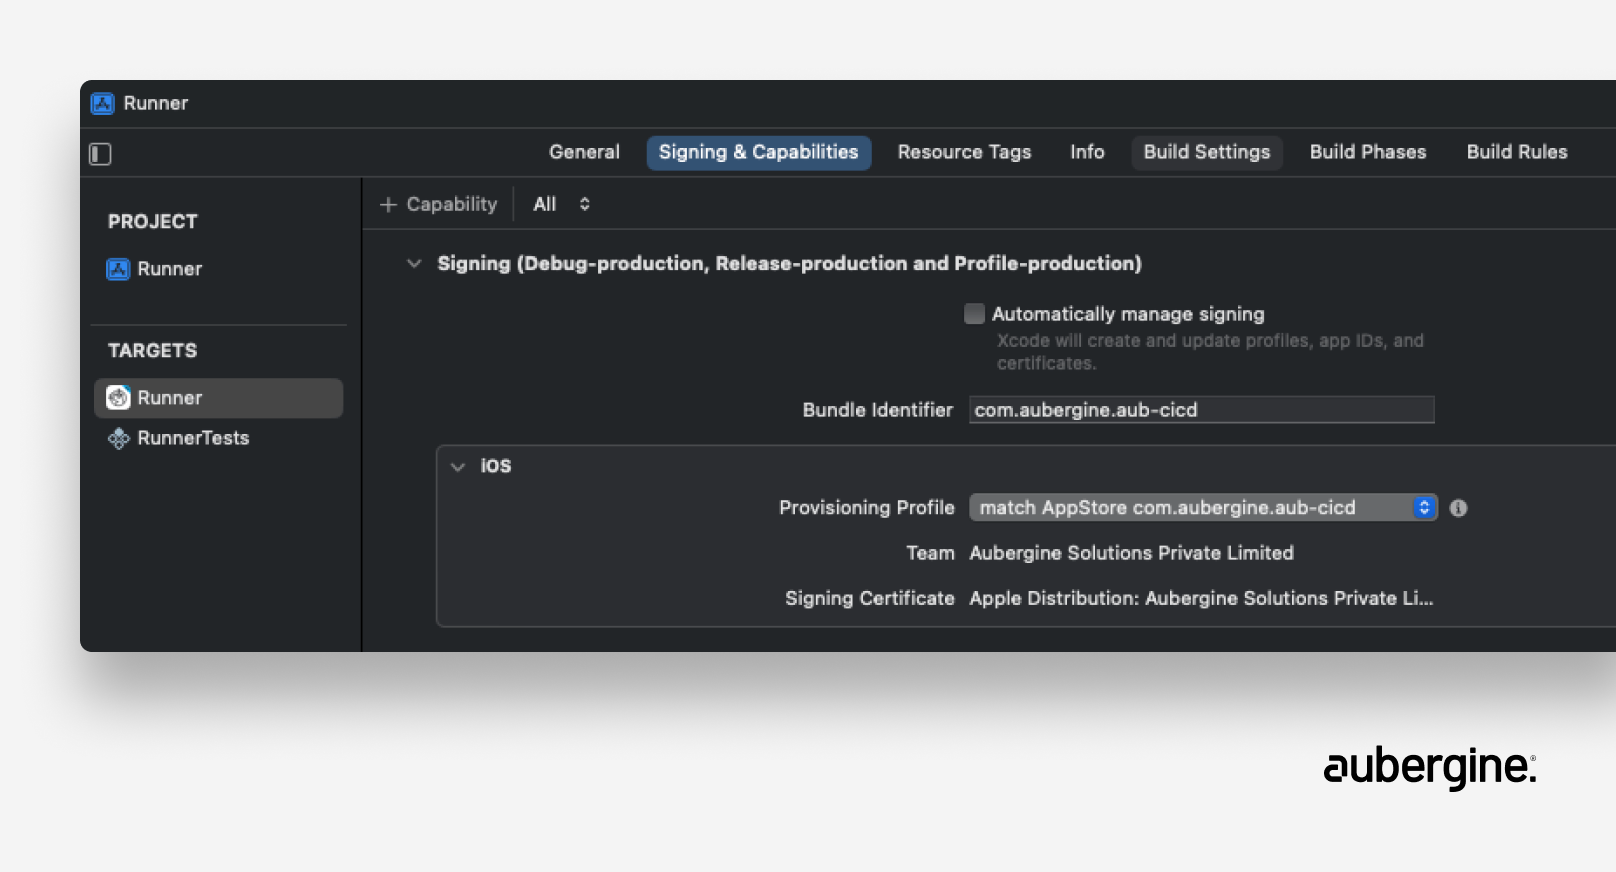
- Verify that the Flutter target is set in your Xcode configuration:

Step 10: Test locally
Before setting up GitHub Actions, test your Fastlane setup locally:
cd ios
fastlane production version:"1.0.0" build_number:1 groups:"<<tester_group>>" release_notes:"First release"
fastlane development version:"1.0.0" build_number:1 testers:"email@example.com" groups:"<<tester_group>>" release_notes:"First release"
Step 11: Set Up GitHub actions workflows for Flutter CI/CD iOS
Create the following workflow files in your repository's .github/workflows directory:
Main Workflow (main.yaml)
This workflow runs tests when code is pushed to the main branch or when a pull request is created:
1name: Flutter CI Tests
2on:
3  push:
4    branches:
5      - main
6  pull_request:
7    branches:
8      - main
9jobs:
10  test:
11    name: Run Flutter Tests
12    runs-on: ubuntu-latest
13    steps:
14      - uses: actions/checkout@v3
15      - uses: subosito/flutter-action@v2
16        with:
17          flutter-version: "3.24.5"
18          channel: "stable"
19      - run: flutter --version
20      - name: Get Packages
21        run: flutter pub get
22      - name: Run Tests
23        run: flutter test
Development deployment workflow (deploy_ios_development.yaml)
This workflow deploys your app to Firebase App Distribution for testing:
1name: Deploy iOS to Development
2on:
3  workflow_dispatch:
4    inputs:
5      version:
6        description: "App Version (e.g., 1.0.0)"
7        required: true
8        default: "1.0.0"
9      build_number:
10        description: "Build Number (e.g., 42)"
11        required: true
12        default: "1"
13      release_notes:
14        description: "Release Notes"
15        required: true
16        default: "Initial Release"
17      groups:
18        description: "Firebase Tester Groups"
19        required: true
20        default: "Internal"
21      testers:
22        description: "Firebase Testers"
23        required: false
24        default: ""
25jobs:
26  deployIOSDevelopment:
27    runs-on: macos-latest
28    env:
29      APP_STORE_CONNECT_API_KEY: ${{ secrets.APP_STORE_CONNECT_API_KEY }}
30      FIREBASE_SERVICE_ACCOUNT: ${{ secrets.FIREBASE_SERVICE_ACCOUNT }}
31    steps:
32      - name: Checkout repository
33        uses: actions/checkout@v3
34      - name: Setup Flutter
35        uses: subosito/flutter-action@v2
36        with:
37          flutter-version: "3.24.5"
38          channel: "stable"
39          cache: true
40        id: flutter
41      - name: Accept Xcode License
42        run: sudo xcodebuild -license accept
43      - name: Get Packages
44        run: flutter pub get
45      - name: Setup Fastlane
46        uses: ruby/setup-ruby@v1
47        with:
48          ruby-version: "3.3"
49          bundler-cache: true
50          working-directory: ios
51      - name: Set up Firebase authentication
52        run: echo "$FIREBASE_SERVICE_ACCOUNT" >> ./ios/fastlane/service-account.json
53      - name: Build and Deploy to Firebase App Distribution
54        env:
55          MATCH_PASSWORD: ${{ secrets.MATCH_PASSWORD }}
56          MATCH_GIT_BASIC_AUTHORIZATION: ${{ secrets.MATCH_GIT_BASIC_AUTHORIZATION }}
57        run: |
58          cd ./ios
59          bundle exec fastlane ios development version:${{github.event.inputs.version}} build_number:${{github.event.inputs.build_number}} release_notes:${{github.event.inputs.release_notes}} groups:${{github.event.inputs.groups}} testers:${{github.event.inputs.testers}}
Production deployment workflow (deploy_ios_production.yaml)
This workflow deploys your app to TestFlight for production release:
1name: Deploy iOS to Production
2on:
3  workflow_dispatch:
4    inputs:
5      release_notes:
6        description: "Release Notes"
7        required: true
8        default: "Initial Release"
9      groups:
10        description: "TestFlight Tester Groups"
11        required: false
12jobs:
13  deployIOSProduction:
14    runs-on: macos-latest
15    env:
16      APP_STORE_CONNECT_API_KEY: ${{ secrets.APP_STORE_CONNECT_API_KEY }}
17    steps:
18      - name: Checkout repository
19        uses: actions/checkout@v3
20      - name: Setup Flutter
21        uses: subosito/flutter-action@v2
22        with:
23          flutter-version: "3.24.5"
24          channel: "stable"
25          cache: true
26        id: flutter
27      - name: Accept Xcode License
28        run: sudo xcodebuild -license accept
29      - name: Get Packages
30        run: flutter pub get
31      - name: Setup Fastlane
32        uses: ruby/setup-ruby@v1
33        with:
34          ruby-version: "3.3"
35          bundler-cache: true
36          working-directory: ios
37      - name: Setup app store connect
38        run: echo "$APP_STORE_CONNECT_API_KEY" >> ./ios/fastlane/store.json
39      - name: Build and Deploy to TestFlight
40        env:
41          MATCH_PASSWORD: ${{ secrets.MATCH_PASSWORD }}
42          MATCH_GIT_BASIC_AUTHORIZATION: ${{ secrets.MATCH_GIT_BASIC_AUTHORIZATION }}
43        run: |
44          cd ./ios
45          bundle exec fastlane ios production release_notes:"${{ github.event.inputs.release_notes }}" groups:"${{ github.event.inputs.groups }}"
Step 12: Add GitHub secrets
In your GitHub repository settings, add the following secrets:
- APP_STORE_CONNECT_API_KEY : The contents of your store.json file
- FIREBASE_SERVICE_ACCOUNT : The contents of your Firebase service account JSON file
- MATCH_PASSWORD : The password you created when initializing Match
- MATCH_GIT_BASIC_AUTHORIZATION : A Base64-encoded GitHub authentication token
To create the MATCH_GIT_BASIC_AUTHORIZATION value:
- Create a GitHub personal access token with appropriate permissions
- Generate the Base64 authorization string: echo -n your_github_username:your_personal_access_token | base64
- Copy the output value to the GitHub secret
Step 13: Test your CI/CD pipeline
Commit and push your changes to GitHub, then:
- Go to the "Actions" tab in your GitHub repository
- Select the "Deploy iOS to Development" workflow
- Click "Run workflow" and fill out the required parameters
- Monitor the workflow execution
If everything is set up correctly, your app should be automatically built and deployed to Firebase App Distribution. Once you're ready for a production release, run the "Deploy iOS to Production" workflow to send the app to TestFlight.
Conclusion
At Aubergine, we specialize in building scalable, high-performance digital products, from idea to impact. Our engineering team brings deep expertise in Flutter, DevOps, and CI/CD automation to help startups and enterprises accelerate development, reduce release cycles, and ensure product quality.
Whether you're setting up your first mobile pipeline or refining an existing process, we partner with you to create robust, reliable, and maintainable systems. We believe great products are built through thoughtful design, engineering rigor, and continuous innovation, and our teams are here to bring that to life.


Authors


.webp)