Animations in Flutter is really easy and awesome.
Ohh! you know this? That’s great then I am sure that while searching for animations in Flutter you must have seen various ways to do it. In this article, I am going to show you some of the options to animate in Flutter.
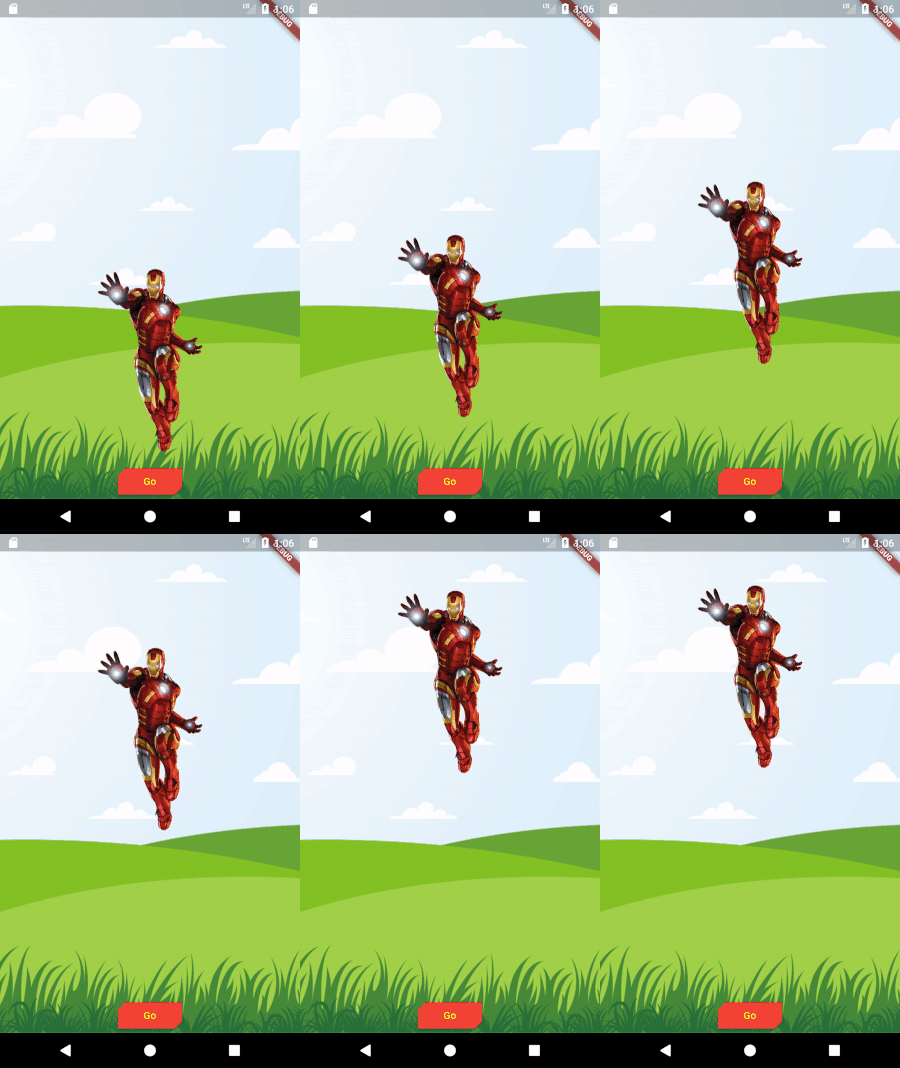
Let’s first see what actually we are going to animate.

Image by http://vecteezy.com
We will be going to fly our Iron man. We will just animate him from bottom to top but using different ways. Let’s see what are they.
Option 1: Pure Animation code
Use this option only if you don’t want to use any implicit(readymade) animated widgets. Don’t worry if you don’t know what is an implicit animated widget. We will cover the rest of options with implicit animated widgets only. Give a quick look at the code so that it can become easy to catch what’s going on.
1import 'package:flutter/material.dart';
2import 'dart:ui';
3
4class Option1 extends StatefulWidget {
5  @override
6  _Option1State createState() => _Option1State();
7}
8
9class _Option1State extends State<Option1> with TickerProviderStateMixin {
10  Animation<double> animation;
11  AnimationController animationController;
12
13  @override
14  void initState() {
15    // TODO: implement initState
16    super.initState();
17
18    animationController =
19        AnimationController(vsync: this, duration: Duration(seconds: 3));
20    animation = Tween<double>(begin: 0, end: -300).animate(animationController)
21      ..addListener(() {
22        setState(() {});
23      });
24  }
25
26  @override
27  Widget build(BuildContext context) {
28    return Stack(
29      children: <Widget>[
30        Container(
31          decoration: BoxDecoration(
32              image: DecorationImage(
33                  image: AssetImage('assets/images/ibg.png'),
34                  fit: BoxFit.cover)),
35        ),
36        Align(
37          alignment: AlignmentDirectional(0,0.7),
38          child: Transform.translate(
39            offset: Offset(0, animation.value),
40            child: Container(
41              height: 250,
42              width: 170,
43              decoration: BoxDecoration(
44                  image: DecorationImage(
45                image: AssetImage('assets/images/ironman.png'),
46              )),
47            ),
48          ),
49        ),
50        Align(
51          alignment: AlignmentDirectional.bottomCenter,
52          child: RaisedButton(
53            onPressed: () {
54              animationController.forward();
55            },
56            child: Text('Go'),
57            color: Colors.red,
58            textColor: Colors.yellowAccent,
59            shape: BeveledRectangleBorder(
60                borderRadius: BorderRadius.all(Radius.circular(20))),
61          ),
62        )
63      ],
64    );
65  }
66
67  @override
68  void dispose() {
69    animationController.dispose();
70    super.dispose();
71  }
72}1animationController = AnimationController(vsync: this, duration: Duration(seconds: 3));
2
3animation = Tween<double>(begin: 0, end: -300).animate(animationController)
4 ..addListener(() {
5 setState(() {});
6 }
7);animationController and animation are used together to control the animation, We are giving time to finish animation as duration to animationControllerandbegin and end position to animation using Tween. Twin object is used to create intermediate values from begin to end value.
1Align(
2  alignment: AlignmentDirectional(0,0.7),
3  child: Transform.translate(
4    offset: Offset(0, animation.value),
5    child: Container(
6      height: 250,
7      width: 170,
8      decoration: BoxDecoration(
9          image: DecorationImage(
10        image: AssetImage('assets/images/ironman.png'),
11      )),
12    ),
13  ),
14),
This is the widget which aligns the iron man at bottom and moves to the top when the animation starts. One important line to notice here is offset: Offset(0, animation.value), this property of Transform.translate will move to a position that animation generates. In our case, it would be from 0 to -300 in an upward direction.
1onPressed: () {
2  animationController.forward();
3},
Credit: https://giphy.com
This code actually triggers the animation and congratulations! you have just learned hard option first.
Also read: Exploring Sensitive Data Handling, API Calls, and JSON Serialization in Your Flutter Heroes App
Option 2: AnimatedBuilder
AnimatedBuilder is a specialized widget that listens to the values generated on the Animation object that is given to its animation property.
How it is different from option1?
1.animate(animationController)
2  ..addListener(() {
3    setState(() {});
4  });
No major difference as such but you can get rid of the above code if you don’t want to listen to animation state. Also, you have to wrap Transform.translate inside AnimatedBuilder so that it can listen to animation values. Check the full code here.
1import 'package:flutter/material.dart';
2
3class Option2 extends StatefulWidget {
4  @override
5  _Option2State createState() => _Option2State();
6}
7
8class _Option2State extends State<Option2> with TickerProviderStateMixin {
9  Animation<double> animation;
10  AnimationController animationController;
11
12  @override
13  void initState() {
14    // TODO: implement initState
15    super.initState();
16
17    animationController =
18        AnimationController(vsync: this, duration: Duration(seconds: 5));
19    animation = Tween<double>(begin: 0, end: -350).animate(animationController);
20  }
21
22  @override
23  Widget build(BuildContext context) {
24    return Stack(
25      children: <Widget>[
26        Container(
27          decoration: BoxDecoration(
28              image: DecorationImage(
29                  image: AssetImage('assets/images/ibg.png'),
30                  fit: BoxFit.cover)),
31        ),
32        Align(
33          alignment: AlignmentDirectional(0.0, 0.7),
34          child: AnimatedBuilder(animation: animation, builder: (BuildContext context, Widget chile){
35            return Transform.translate(
36              offset: Offset(0, animation.value),
37              child: Container(
38                height: 250,
39                width: 150,
40                decoration: BoxDecoration(
41                    image: DecorationImage(
42                      image: AssetImage('assets/images/ironman.png'),
43                    )),
44              ),
45            );
46          }),
47        ),
48        Align(
49          alignment: AlignmentDirectional.bottomCenter,
50          child: RaisedButton(
51            onPressed: () {
52              animationController.forward();
53            },
54            child: Text('Go'),
55            color: Colors.red,
56            textColor: Colors.yellowAccent,
57            shape: BeveledRectangleBorder(
58                borderRadius: BorderRadius.all(Radius.circular(20))),
59          ),
60        )
61      ],
62    );
63  }
64
65  @override
66  void dispose() {
67    animationController.dispose();
68    super.dispose();
69  }
70}
Option 3: SlideTransition
Use this when you want to change the position of a widget relative to its current position.
1Align(
2  alignment: AlignmentDirectional(0.0, 0.7),
3  child: SlideTransition(
4      position: animation,
5      child: Container(
6        height: 250,
7        width: 150,
8        decoration: BoxDecoration(
9            image: DecorationImage(
10              image: AssetImage('assets/images/ironman.png'),
11            )),
12      )
13  ),
14),
You don’t need AnimatedBuilder and Transform.translate because SlideTransition does the job of two. Look at this position: animation property. It listens for animation values as well as change the position of the widget.
Sine position property expecting animation of object offset, we needed to change from this.
1animation = Tween<double>(begin: 0, end: -350).animate(animationController);To this. The tween of Offset.
1animation = Tween<Offset>(begin: Offset(0, 0), end: Offset(0, -1.2)).animate(animationController);Try to play with the below code.
Also read: Flutter Text Reader Animation: Bringing Text to Life
Option 4: AnimatedPositioned
This is one of the implicit animated widgets. You don’t need animationController, animation, and Tween. So where we will define Duration? Good question. Check this out.
1AnimatedPositioned(
2  duration: Duration(seconds: 3),
3  bottom: _ironManAlignment,
4  left: 90,
5  child: Container(
6    height: 250,
7    width: 150,
8    child: Image.asset('assets/images/ironman.png'),
9  ),
10),
Here it is → duration: Duration(seconds: 3) and the bottom property has given this
1double _ironManAlignment = 50;Now whenever we change this using
1setState(() {
2  _ironManAlignment = 320;
3});
The animation will be performed automatically moving iron man from bottom position 50 to 320. Ya, you get it for free. The code snippet below.
1import 'package:flutter/material.dart';
2
3class Option4 extends StatefulWidget {
4  @override
5  _Option4State createState() => _Option4State();
6}
7
8class _Option4State extends State<Option4> with TickerProviderStateMixin {
9
10  double _ironManAlignment = 50;
11
12  @override
13  Widget build(BuildContext context) {
14    return Stack(
15      children: <Widget>[
16        Container(
17          decoration: BoxDecoration(
18              image: DecorationImage(
19                  image: AssetImage('assets/images/ibg.png'),
20                  fit: BoxFit.cover)),
21        ),
22        AnimatedPositioned(
23          duration: Duration(seconds: 3),
24          bottom: _ironManAlignment,
25          left: 90,
26          child: Container(
27            height: 250,
28            width: 150,
29            child: Image.asset('assets/images/ironman.png'),
30          ),
31        ),
32        Align(
33          alignment: AlignmentDirectional.bottomCenter,
34          child: RaisedButton(
35            onPressed: () {
36              _flyIronMan();
37            },
38            child: Text('Go'),
39            color: Colors.red,
40            textColor: Colors.yellowAccent,
41            shape: BeveledRectangleBorder(
42                borderRadius: BorderRadius.all(Radius.circular(20))),
43          ),
44        )
45      ],
46    );
47  }
48
49  void _flyIronMan() {
50    setState(() {
51      _ironManAlignment = 320;
52    });
53  }
54
55}
Option 5: AnimatedContainer
My favorite option. This is also one of the implicit animated widgets. You know now what it is. The main difference from Option4 is that this widget is able to perform automatic transition for all property that one container possesses. Meaning just using this widget you can move iron man from bottom to top as well as you can increase the size of him and what not.
1AlignmentDirectional _ironManAlignment = AlignmentDirectional(0.0, 0.7);
2AnimatedContainer(
3  duration: Duration(seconds: 3),
4  alignment: _ironManAlignment,
5  child: Container(
6    height: 250,
7    width: 150,
8    child: Image.asset('assets/images/ironman.png'),
9  ),
10),
Below code will trigger the automatic transition.
1setState(() {
2  _ironManAlignment = AlignmentDirectional(0.0,-0.7);
3});1import 'package:flutter/material.dart';
2
3class Option5 extends StatefulWidget {
4 @override
5 _Option5State createState() => _Option5State();
6}
7
8class _Option5State extends State<Option5> with TickerProviderStateMixin {
9
10 AlignmentDirectional _ironManAlignment = AlignmentDirectional(0.0, 0.7);
11
12 @override
13 Widget build(BuildContext context) {
14 return Stack(
15 children: <Widget>[
16 Container(
17 decoration: BoxDecoration(
18 image: DecorationImage(
19 image: AssetImage('assets/images/ibg.png'),
20 fit: BoxFit.cover)),
21 ),
22 AnimatedContainer(
23 duration: Duration(seconds: 3),
24 alignment: _ironManAlignment,
25 child: Container(
26 height: 250,
27 width: 150,
28 child: Image.asset('assets/images/ironman.png'),
29 ),
30 ),
31 Align(
32 alignment: AlignmentDirectional.bottomCenter,
33 child: RaisedButton(
34 onPressed: () {
35 _flyIronMan();
36 },
37 child: Text('Go'),
38 color: Colors.red,
39 textColor: Colors.yellowAccent,
40 shape: BeveledRectangleBorder(
41 borderRadius: BorderRadius.all(Radius.circular(20))),
42 ),
43 )
44 ],
45 );
46 }
47
48 void _flyIronMan() {
49 setState(() {
50 _ironManAlignment = AlignmentDirectional(0.0,-0.7);
51 });
52 }
53
54}Done!
There are many things can be done with any of the above options, for example, you can define a Curve like easeIn and easeOut to have real-life momentum to iron man.
All of the above methods will produce the same result. Choose the best fit for your case.
Note: These are not all options but you may find even more while exploring Flutter a little more.
Small Challenge: So you learned good things today. Now it’s time to polish it. I want you to move iron man up and then again at the bottom. If you achieve this, please tweet it. Also, mention me so that I can RT.
Clone it. Play with it:
Here is a demo showcasing various ways to animate in Flutter.
Also read: Crafting a Flutter Onboarding Page Indicator in Just 3 Minutes.


.webp)

.webp)